Simple Tailwind CSS and Parcel Bundler Setup
I started the @100daysofcodechallenge last week and I started with a new project. I started coding PhotoMania, a photo gallery app using Pexels API. After think about the stack to use for the app, I thought Tailwindcss and Parcel Bundler couple with HTML and JavaScript would would be okay to use, because my intent is to add cool features that mimics the Pexels website, and I want a simple setup.
While setting up tailwindcss and parcel, I encountered difficulties that I wasn't prepared for, however I was able to set them up. I this article, I will share the steps on how to set up tailwind and parcel bundler.
This article will be simple and straight to the point.
Step 1: in your project directory open a directory named src. Inside add the index.html, style.css and app.js files.
Step 2: open your terminal, in your project directory install parcel bundler using npm install parcel-bundler --save-dev or
yarn install parcel-bundler. This command will install parcel as a dependency in your project.
Step 3: link the style.css and app.js to the index.html
Step 4: if the package.json file is not installed, you can run this npm init -y or
yarn initcommand to open a package.json file
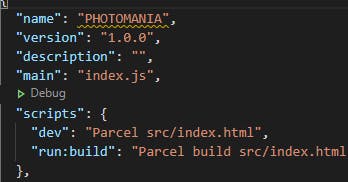
Step 5: in the package.json file. We will write two scripts.

"dev": "Parcel src/index.html"
"run:build": "Parcel build src/index.html"
Then we'll run this command npm run dev.
The above command will run our project in development mode at localhost:1234, parcel will bundle all the file in the src directory to a newly created dist directory.

Now to the most important part.
Step 6: install tailwindcss using the following command.
npm install -D tailwindcss@npm:@tailwindcss/postcss7-compat @tailwindcss/postcss7-compat postcss@^7 autoprefixer@^9
for tailwindcss to work properly with parcel, the postcss version 7 and, not version8, is what we need.
You can read the tailwind CSS documentation for more information
step 6: after the installation, our package.json file will contain all the packages we have installed. it should look like this:
{
  "name": "PHOTOMANIA",
  "version": "1.0.0",
  "description": "",
  "main": "index.js",
  "scripts": {
    "dev": "Parcel src/index.html",
    "run:build": "Parcel build src/index.html"
  },
  "keywords": [],
  "author": "",
  "license": "ISC",
  "devDependencies": {
    "@tailwindcss/postcss7-compat": "^2.0.3",
    "autoprefixer": "^9.8.6",
    "parcel-bundler": "^1.12.4",
    "postcss": "^7.0.35",
    "postcss-cli": "^8.3.1",
    "tailwindcss": "npm:@tailwindcss/postcss7-compat@^2.0.3"
  }
}
step 7: create a postcss.config.js file and add the following line of code.
module.exports = {
    plugins: {
        tailwindcss: {},
        autoprefixer: {}
    }
}
Conclusion:
Anytime you run npm run start in your terminal, Parcel will bundle the tailwindcss to the dist directory.
Happy coding.